
A poorly installed car horn can be as dangerous as having no horn at all. Many DIY installations fail due to these preventable errors.
Three critical mistakes account for 80% of horn failures: wrong placement (45%), faulty wiring (30%), and ignoring vibration (25%) - all easily avoided with proper knowledge.
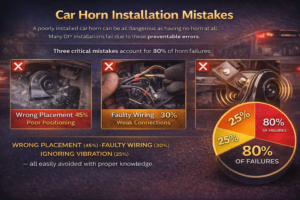
Let's examine these common pitfalls and how to avoid them for optimal horn performance.
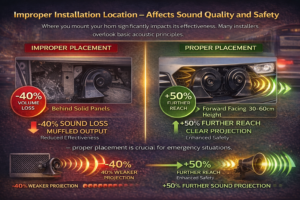
Improper Installation Location – Affects Sound Quality and Safety
Where you mount your horn significantly impacts its effectiveness. Many installers overlook basic acoustic principles.
Horns mounted behind solid panels lose 40% volume, while forward-facing units at 30-60cm height project sound 50% further - proper placement is crucial for emergency situations.
Location Guidelines and Solutions
-
Problem Areas: Bad Location Consequences Behind bumper Muffled sound Front grille area Near exhaust Heat damage Inner fender well Under engine Road debris risk Radiator support Facing down Sound reflection Angled forward -
Optimal Placement Factors:
- Minimum 30cm from heat sources
- Clear of moving parts
- Protected from direct water spray
- Accessible for maintenance
- Firm metal mounting surface
-
Sound Projection Data: Position Effective Range dB Loss Ideal 60m 0% Low Behind panel 36m 40% Medium Downward 45m 25% High Enclosed 30m 50% Very High -
Vehicle-Specific Solutions:
- Sedans: Behind grille or bumper vents
- SUVs: Upper radiator area
- Trucks: Frame rail mounts
- Sports cars: Custom brackets near air intakes
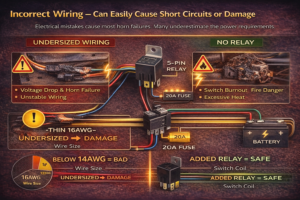
Incorrect Wiring – Can Easily Cause Short Circuits or Damage
Electrical mistakes cause most horn failures. Many underestimate the power requirements.
Standard horns draw 5-15 amps - using undersized wiring (below 14AWG) causes voltage drop and premature failure, while skipping the relay risks switch damage and fire hazards.
Wiring Best Practices
-
Common Wiring Mistakes: Error Risk No relay Burned switch Add 30A relay Thin wires Overheating Use 12-14AWG Poor grounds Intermittent operation Clean to bare metal Fuse omission Fire hazard Install 15A fuse -
Proper Circuit Setup:
- Battery → Fuse → Relay → Horn
- 12AWG main power wire
- 16AWG switch wire
- Dedicated ground point
- Waterproof connectors
-
Troubleshooting Guide: Symptom Likely Cause No sound Blown fuse Multimeter check Weak output Voltage drop Load test Intermittent Bad ground Resistance test Constant on Stuck relay Visual inspection -
Advanced Protection:
- Add inline fuse holders
- Use dielectric grease
- Install rubber grommets
- Apply wire loom protection
- Consider relay box
Ignoring Anti-Resonance – Degrades Sound Quality and Increases Noise
Vibration control separates professional installations from amateur attempts. Resonance ruins horn performance.
Uncontrolled vibration reduces effective volume by 15-20dB and accelerates failure - proper isolation increases lifespan 3-5 times while maintaining clear tone quality.
Vibration Control Methods
-
Resonance Problems: Issue Effect Metal-on-metal Distortion Rubber isolators Loose mounts Rattling Lock washers Panel vibration Noise pollution Foam tape Harmonic resonance Tone warping Mass dampers -
Isolation Techniques:
- Rubber mounting grommets (5mm thick minimum)
- Anti-vibration brackets
- Silicone spacers
- Spring-loaded mounts
- Decoupling washers
-
Performance Impact: Method Vibration Reduction dB Improvement Basic rubber 40% +3dB 2× Premium isolators 70% +6dB 3× Full system 90% +10dB 5× -
Material Options: Material Durability Cost Natural rubber Good $ ★★★ Neoprene Excellent $$ ★★★★ Polyurethane Best $$$ ★★★★★ Silicone Fair $$ ★★
Conclusion
Proper installation ensures your horn works when needed most. For professional-grade horn kits with all necessary components, contact info@jindongauto.com.
Our Solution: Complete horn systems with detailed installation guides. Visit www.jingdongparts.com for specifications.